Port Flow Calculator consists of 4 screens.
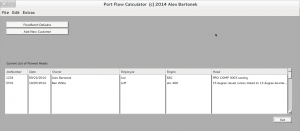
1. The Main screen
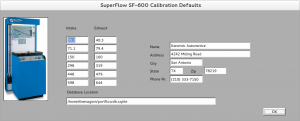
2. SF-600 Calibration Defaults/Company Information
3. New Customer entry screen
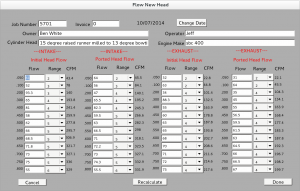
4. New head flow screen
When you initially run PFC it will create a SQLite3 database called portflowdb.sqlite. If you want to make a backup of the database for safe keeping, then all you need to do is copy that one file.
You will be greeted with the PFC Main screen which looks like the below, except you will not have any data..I just have test data that way I can show you what to expect.
The first thing you should do is setup your SF-600 calibration defaults and Company Name or Your name. You will do that by clicking on the Flow Bench Defaults button. On the left side of the screen you will see the Intake and Exhaust column. Enter the Intake numbers on the left, then Exhaust on the right. Once complete, enter the Company information or whatever information you want listed on the SuperFlow SF-600 Results report. That will be on the right, obviously.

Once you’ve done this, you are ready to add a Customer’s head into the database. Do so by clicking on Add New Customer. In Add New Customer, enter the Job Number (required), Invoice (optional), Owner (of the head), Operator (the Employee flowing the head), Cylinder head model, Engine Make, then click on Save. After clicking on Save, you will be sent back to the PFC Main screen and you will see the “Current List of Flowed Heads” populated with the new Customer you just added.
When you’re ready to flow a head, double click on the new Customer and the Flow New Head window will pop up. You will see the information you entered about the Job Number and Customer etc populated on the top. It is not editable. Now, you will see 4 columns which are pretty self-explanatory. Starting from LEFT TO RIGHT, you will see Intake Initial head flow which is the head BEFORE you do any porting, then Intake Ported head flow which is the head AFTER you do any porting, then Exhaust Initial head flow which is your head on the exhaust side before any porting, then finally Exhaust Ported head flow which is…the exhaust side after porting.
If you only flow the heads to .500, then just fill out the fields up to .500 and leave the rest without any values. The report will only show the fields up to .500. Start off by selecting the Range from the SF-600, then type Flow number off of the SF-600 into the .050 lift, hit the TAB key and it will calculate the CFM on the fly. Based on this you can see if you need to flow the same lift at the next Range or not etc. The Recalculate button is there to update CFM if for some reason you do not TAB to the next field or you do not see CFM updated after you change Range/Flow values. When you are done, click Done and SAVE. If you do not want to save anything, just click Cancel.
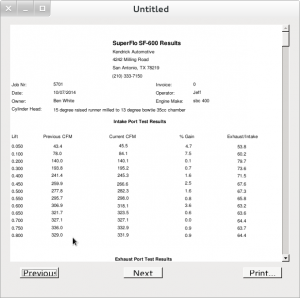
After you click Save (or Cancel) you will see the PFC Main screen again and your Customer in the “Current List of Flowed Heads”. If you RIGHT CLICK on the Customer a menu pops up and you will see “Print Flow Sheet”. This will give you a preview of what you will see on the report. Click PRINT to print. Select your printer and you’re done.
If you have any questions, find a bug, want a feature added, just email me. My Contact information is in the Extras –> About PFC menu item, or you can contact me thru this website at the Contact Me link above.


